Showing posts with label present. Show all posts

Monday, December 29, 2014

Car themed Tissue Box Holders

Recently, i have an order for a Car Tissue Box Holder from a dear friend. She wanted it to give to someone as a Christmas Gift.

She showed me a photo of the sample & asked if I can make something similar. 

This is what I made...

And, to make it more personalised, I asked to add in the recipient's initial...:)

After I delivered it, she asked me to make another one in Red! So so happy that she loved it so much...

TQ for your orders, Elaine! :D

Tuesday, December 2, 2014

Aeroplane Plush

Honestly, I have made a lot of Airplanes, but have not really write a blog about it. Reason being I couldn't find an airport mat to place the planes on...

Anyway, since I am preparing for boy's version of toys (plus, we dont know what gifts Constantine is going to give his male friend for the Xmas exchange party on Friday. (Please refer to my previous blog on the Cars to find out more)

I have some small airplanes, & some big ones...

These are the small ones...for the small ones, i actually made them into magnets & keychains as well...

These are the big ones...

For comparison of the big & small ones...

These photos are also taken by my boys...pretty good! :D

Note that these are not my original pattern. You may refer the original pattern here: http://www.innerchildcrochet.com/patterns/mini_stuffed_airplane.html

Monday, December 1, 2014

The wheels on the car goes round & round...

This blog has been my longest overdue blog of the year!

I have been wanting to do some boys version of Toys out of yarns but never been able to start until now.

Of course, it is with a little 'motivational' push from my eldest son...lol...He told me that they are going to have a gift exchange for Xmas in school next week...everyone will have to prepare a little present & give it to a 'secret' friend they got through ballot system. He got a male friend. So, we have to prepare a gift for a male friend. 

Not knowing what this friend likes, we better prepare some boys version of toys, just in case...

In case you are wondering why I make so many, this is because I also have a Christmas Bazaar coming up next week, so I'm preparing for it as well...:D I made 12 in total, all different colours!

This is not my own design, but I really love the shape of the car, so I've decided to make it regardless. You may refer here (http://www.redheart.com/free-patterns/happy-little-car-plane-truck)
for the original pattern. I have mine a little modified.

They are just lovely!

Oh, since I am busy preparing for other items for the bazaar, i asked my 2 boys to take photos for me.

I can see that they put in a lot of effort & the result turned out great! Especially the track...


Tuesday, November 18, 2014

Garden Fairy?

Constantine's classmate is having a Pirate & Garden Fairies themed birthday party soon, so i have to think of something to make, that is so special that it can not be purchased anywhere else. Most importantly, it has to resemble the birthday girl!

So, i asked the mommy what dress the birthday girl is going to wear on that day...she sent me a photo...

Based on this dress theme color, i started to check on the fairy's design. I found this from www.flowerfairies.com...this is perfect!
 I like the 'petal' dress...so I'm going to make one, using the same design as my sunflower petals...

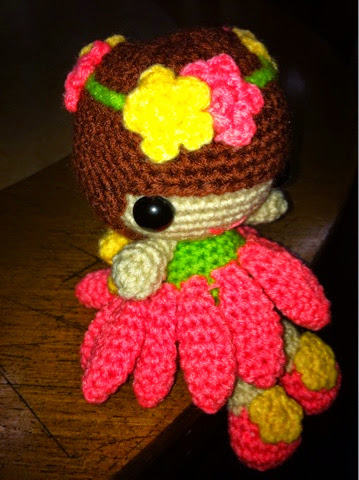
Since the birthday girl's dress is Green & Peach, i made the top Green & petal dress Peach...

Then, i made the matching Peach ballerina flats with a Yellow flower on it. The flower has to be small or else it will cover the shoes...so, no fancy flowers...

Then, I started to think of the head of the fairy...Hm...how should I make it? Oh well, since I'm also into big head small body dolls (like my friendship Kokeshi Dolls collection, read here: http://designedwithpassion.blogspot.com/2014/07/presentingthe-friendship-kokeshi-dolls.html), I might as well make it the same!

I changed the hair color to Brown as I am using Beige color as the skin tone. (Black hair won't stand out). I love the outcome!

And since it is a garden fairy, no harm to wear a garland with flowers, right? :D

Oh, I also put a piece of pipe cleaner in each of the fairy's leg, so that the leg can be bended to sitting position...pretty cool! See how her legs bend at the edge of the table?

She can stand...well...not too stable...

She can sit...

Oh...I made a pair of Yellow wings too...how can I miss it...:) i wanted to make a large pair of wings but i'm afraid it will cover the dress, so I made a small 1 instead...

This fairy is too cute!

I hope Constantine's little friend will love it! :D

Material used: Acrylic Yarn, Polyester Fiber Fill, Safety Eyes, Pipe Cleaner
Duration of Completion: 5 man hours
Experience/Satisfaction level: 😍 hope to make more too!

Monday, November 10, 2014

Our Very 1st Crochet Fun Camp :D

Our fans have been very kind to us all this while. They have been providing feedback & suggestions in order for us to improve.

Many had requested for workshops, so, we have decided to make it happen this coming December! :D

We will be organizing our very 1st Crochet Fun Camp from the 15th - 19th December 2014 at KGNS, Kelana Jaya. We have 2 time slots: 9am - 12nn or 1.30pm - 4.30pm. For parents who require late pick up after the camp, we can accommodate as well, but please inform us upon sign up.

Throughout the 5 days fun camp, we will be creating at least 5 masterpieces. We are confident that everyone will have loads of fun doing it as well. Hint: some of the masterpieces will be Xmas presents for daddies & mommies! :P

We also encourage campers to come in pairs....what better way to enjoy something fun with someone you are close with, right? We will be giving a 10% discount for those who come in pairs or group. you can come with your parents, kids, siblings, relatives or friends. there is no restriction!

We only allocate 20 places for each session. This is to ensure quality interaction between the campers & instructor. No, you won't be watching the instruction from the YouTube! Yes, you will have to have face to face interaction throughout the camp! :D 

So, call us @ +6012 209 0906 to book your place NOW...
A little introduction of the instructor: Joey is a mother to 3 wonderful kids who designs, crafts & sells beautiful items out of yarns. Her dream is to re-introduce Crochet as a fun & yet relaxing activity to everyone who is interested. She was a business development professional, and now in the midst of pursuing her dream, one baby stitch at a time. She holds a Certificate of Good Conduct, issued by the MOFA Malaysia. Joey created the brand "Designed With Passion". As the name says it, this is where all items are carefully designed & hand-crafted with lots of patience, passion & love, for she believes everyone is special & deserve all the special attention!

Tuesday, October 21, 2014

Happy Birthday Elaine! Hope U like Your Sunflowers Bouquet!

Recently, I have an order from an ex-colleague. She wants to order a half dozen bouquet of sunflowers for her colleague cum best friend's birthday.

To be honest, I have always wanted to make sunflowers but never get a chance to make it as I don't know how it will turn out. I have no confidence to even try it last time!

So, when I receive an order, I told myself, somehow I need to overcome it. 

I begin with doing a lot of researches on sunflowers, the shape, the back of it, the colour, etc...thanks to the Internet, I managed to find what I am looking for!

This is one nice bouquet, photo downloaded from the Internet...

Of course, this is a huge bouquet, so, I need to reduce the number of sunflowers to only 6 stalks.

Then, I started to research on flowers that represent friendship, since this is a custom make bouquet with a personalised touch!

I found two flowers: 

This is White Hydrangea. It symbolises friendship & devotion. It represents understanding & it is seen as 1 of the purest ornamental flowers. Its magnificent bloom is a bouquet of dedication & it can be described as heavenly beautiful & charming. (Source: onlineflowerguide.com)

This is Yellow Acacia (photo source from Environmental World of Australia). The symbolic meaning of Acacia are friendship, secret love, beauty in retirement & chaste love. You can find a lot of this plant in Australia.

It took me about 3 hours to do all the researches & to find a sample that I like...then, it is back to my thinking zone.

According to my ex-colleague, she doesn't want the bouquet to be too huge or too heavy; & I have to include the White Hydrangea & Yellow Acacia into the bouquet...

So, this is what I made...

A bouquet of White Hydrangea, with some fern leaves...

Up-close pictures of it...

Then I made 3 stalks of Yellow Acacia. Each stalk contains 3 little yellow balls. Again, I added some fern leaves.

Up-close pictures...

After completed these 2, now the most 'fun' part...the SUNFLOWERS!

I started the experiment with the centre, then the petals...here's what I got...

This is a very large sunflower! Just so you know how huge this sunflower is, I made a comparison with my iPad mini...

I think I'm very satisfied with the outcome, so I continued with the other 5 stalks. I've decided to put 2 large stalks & 4 smaller ones.

Here's the small ones...

For comparison...the small flower is as big as my palm.

If I put both large & small together, you'll see a huge difference...

Now, I need to make the back part of the flowers...

Here's the picture I downloaded from the Internet...

Hm...very complicated back...so, this is what I made...

OK, all the flowers are ready, now the stems! I used lots of lots of wire stems for this bouquet as the flowers are rather heavy...I need a good support for it to stand up...oh, I also used balloon sticks for the very 1st time...loved it so much...I think I will continue to use it from now onwards. I then wrapped my stems with 8-ply green yarn. My 1st time too! If you know me, I always use ribbons to wrap my stem. I think the outcome is not bad huh...

These 2 are the large ones...

And, these are the small ones...

Ok...all done...except...where to put the name card? So, I made this, together with a clip beneath it...yes, it's a butterfly...:)

All done finally...now, this is a very challenging part for me as I am not very good with flower arrangements. But I think I passed...what do you think? :D

I asked a friend to hold the flowers so I can take the pictures...

The butterfly is so cute & prominent huh...

Final touch...the red ribbon to hold all together tightly...

And, it is ready to be delivered...

Oh, since I also know this colleague who is celebrating her birthday, & since she had requested a bunny rabbit as a present from me...here's what I made...I also bought her a cake...

On the way to meet her new owner...

This is a picture that my ex-colleague sent me when the bouquet & bunny rabbit is received....

All in all, my 1st bouquet of sunflower is a huge success! :D I might even consider making some for myself, when I have time...:P

Total duration took to make this bouquet: 48 man hours, not inclusive of research time. The experience: priceless! :D

Happy birthday to you, Elaine! May your year be blessed with more happiness & joy!