I love to organize themed parties. I have done so many for my 2 boys previously. This time, it is for my girl.
She loves Minnie Mouse & so, she will have a Minnie Mouse themed party for her 1st birthday...:)
I also did something out of the norm. No balloons for this time. They can be expensive, & it would be a waste if no one wants to bring home...lol
I have decided that i want to make everything myself, as much as possible...and, I have chosen both Red & Pink as the themed colours...
So, here goes:
1) The Invitation Card
The Invitation Card is pretty simple. I downloaded the template that I wanted from the internet & put in the text & photos...
2) The Outfit
Birthday Girl's outfit of the day...modified it as well...lol
From this:
To this:
Lots of Pink & Red rhinestones are used for the outfit for both baby & mommy...:)
Up-close at waistline: 2 Pink Minnie & 1 Red Minnie...
Up-close at sleeves: 1 Pink Minnie on each side of the sleeve...
Up-close at the bottom left of the dress: 3 Red Minnie...
The booties:
Dark & Light Pink Combination... I added the Pink Rhinestone on the Boutique Bow...this pair of booties are hand crocheted...
Mommy's outfit of the day:
From this:
To this:
1 Pink Minnie on the shirt; 2 Pink Minnie & 1 Red Minnie on the skirt...LOL
3) The Cake
Pretty simple cake. i used to order fondant cakes previously. This time, I chose not to order fondant cake as most of the time, we throw away the sugar coating. This cake was ordered from Kobo, they used only natural ingredients to make the cake. I chose a Vanilla & Blueberry cake & requested for less sweet version. i am pretty satisfied with what I got. Oh, the alphabets are not sugar, they are made from chocolate.
4) The Party Pack
There are 3 items in the party packs for each family:
a) Minnie Mouse Butter Cookies - Vanilla & Chocolate (it took me 2 weeks to find the mold)
Somehow, i love the Chocolate version better...less sweet & more fluffy...i made 1 tray more for the chocolate ones...lol
I packed it into cookie jar, stick a Minnie Mouse sticker on the cover & tie a ribbon on each jar...the ribbon looks like a Minnie Mouse signature bow...lol
b) Minnie Mouse Coasters
Each set comes with 5 colors: Black, Red, Pink, Light Pink & White
I then tied the coasters together with the polkadot ribbons...
Now, it looks more like a Minnie Mouse head...lol
c) the Centerpiece/decoration
This is supposed to be multiple usage: as part of the decoration for the phone corner, to be put in the party pack & as centerpiece for each table...
The vase was from recycled glass bottle. Each bouquet has 5 stalks of Roses of different colours & 1 Minnie Mouse icon. I then wrapped the bottle with polkadot plastic, tied it with polkadot ribbon. Then I stick a Minnie Mouse Bow on the bottle. The roses, bow & Minnie icon are all hand crocheted.
5) The decorations - printed all on art card & cut it out ourselves. Thanks to Hubby that helped cut it out...
a) Banner
b) Menu
Before...
c) TQ Card
d) Baby Hi-Chair decoration
Before...
e) Cupcake Toppers
Before - these are printed on art card for the toppers & stickers for the cookie jars & cutlery sets...
f) Minnie Mouse Stickers - for cookie Jars & cutlery set
g) 'Fake' cake
This 2-tier cake is hand crocheted, using Dark Pink (bottom layer) & Light Pink yarn. I put a star, a bow, a Rose, a heart & a minnie icon as part of the cake decoration. The candle is real...lol
For the bottom layer, i wrapped with Red polkadot ribbon & for the top layer, i sewn on some Black Rhinestone to make it a Minnie icon as well.
Then, i stick Alphabet stickers on the base plate & used Pink rhinestones to decorate it. I arranged all the rhinestones into Minnie icon!
h) the 'Guardian' of the cake
My sons said these are the guardian of the cake...lol
I made 2: 1 with Red bow & 1 with Pink bow...my kids helped with the painting of the balls to black. I then make a ribbon & stick on it. Added in 4 stalks of giant crochet Roses (each 1 is as big as my palm). The vase also from recycled bottle. I wrapped it with polkadot paper that i printed out.
i) Minnie Mouse Icon
These were made using Polypropylene Ribbons. I used 3 colors: Black, Red & Pink
I made it into garlands as well as table decoration. You can also find these on the hi chair!
And, we are ready for the party! :D
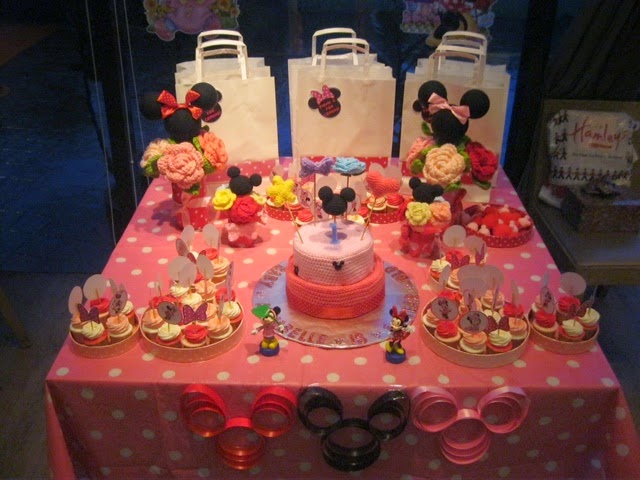
The Table setting:
The Photo Corner:
Those white bags behind are the party bags...
I made 3 trays for the cupcakes, using 1 big round container & 2 smaller containers...I made 2 pink ones & 1 Red one...
Cupcakes were ordered from Wondermilk...ordered 2 flavors this round: Vanilla & Chocolate Chip. The cupcake toppers will tell whether it is Vanilla or Choc Chip. Hint is on the menu, top right...:)
Saw the garlands? It is everywhere! :D
Here's how the cupcake holder looks like, birds eyes view...
The Fruit Platter, cut using cookie cutter...
The actual cake with figurine...
I hope everyone enjoyed! :D


