Showing posts with label excited. Show all posts

Wednesday, August 3, 2016

Birthday Parties for the Kids

Last December, we had a small birthday celebration for both Christopher & Annabelle...

Since it was just a small lunch with the grandparents, I only order a cake for each of them...

Christopher was into Lego Star Wars...so he requested a Lego Star Wars theme. Made him this cake with lots of Star Wars mini figures...


As for Annabelle, she is into Sofia the First so I ordered a Sofia cake for her, with Sofia & Clover mini figure...


The birthday boy & birthday girl busy munching on the cake!


Friday, July 29, 2016

Chinese New Year Decoration at Craft Space

Chinese New Year is just a month away...to welcome the year of the Monkey...u should expect to see a lot of Monkey themed crafts...I really mean it 😜😜😜

After the successful decoration for Halloween & Xmas, we just can't stop & we want to continue to challenge ourselves further!

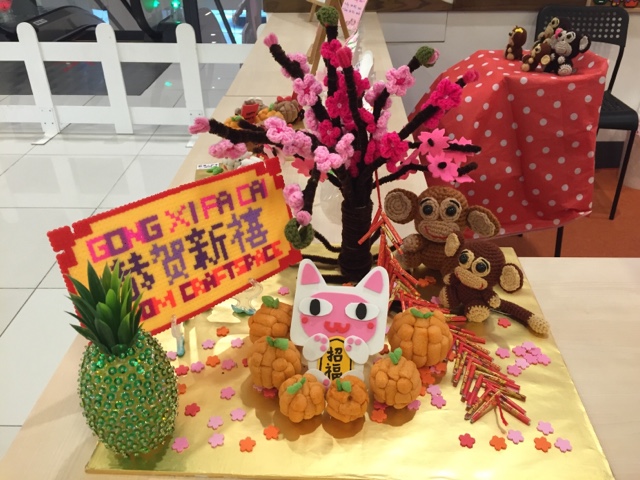
So, for this CNY decoration, we made cute monkeys...


How can we not have the Cherry Blossom tree???

We even added some Mandarin Oranges made from Magic Nuddles...

We have lots of cherry blossom flowers on the floor too!

Not to mention a lucky cat made from foam AND fire crackers from Ang Pow packets! 😍😍😍

I even took out my pride possession...the pineapple that I made when I was a teenager...cool huh?

Best of all...the wishing board is made using LOTS of Perler beads...we even manage to make it in Chinese characters...


We also made 2 Lucky Cats out of Perler Beads & are now on display...hopefully they will bring us more sales 😊😊😊

This decoration project is making all the instructors excited but for Putra team...we actually got some kids to involve in the making!

This masterpiece took us about 2 weeks to complete which involved at least 50 kids! 😍😍😍

Super loving this!


Happy Spooky Halloween

Last October, in conjunction with Halloween, we used Magic Nuudles to make a Halloween theme decoration...

This is work in progress...

1 giant Jack-O-Lantern, 1 small one, 1 haunted villa, 1 treat-or-trick basket filled with candies, and 1 spooky oak tree...oh, did u see the owl?


This is the completed version...

We added more items to make it more interesting! We added another oak tree...some ghosts, tome stones & another Jack-O-Lantern...

Look at the giant spider & it's baby! The baby is crawling on the top right side...

We also added lots of tiny bats...too bad it is too small to be noticed unless you go close...😂😂😂

I love this setup...we displayed it for about 3 weeks & there were lots of people who came & took pictures with it...guess it became an attraction huh...

Constantine's 1st Craft Party

During the last school holiday, Constantine wanted to invite his friends over for a gathering, so we organized a Craft Party!


This is taken after we have set up the snack area. Christopher got an invitation to the Craft Party too & he is pretty excited because his friend (one of Constantine's classmate's younger brother who is also Christopher's classmate) will also be coming!


This is the entire setup, ready & waiting for the kids' arrival. Yuya & his brother were the first to arrive. So Constantine & Christopher were playing with them at the back.


Kids are having fun with Perler Beads! 


They are having fun with Magic Nuudles!


All in all, it was a success! I hope all of the kids had fun! 😜😜😜

Thursday, February 5, 2015

Hanging Sheep

Recently, I got an order to produce 26 units of Hanging Sheeps. It is to be hung on the ceiling of a mall in Klang Valley.

It took me almost 2 weeks to finally conclude what & how I want to make it. You see, since this is for hanging on the ceiling, certain important measures have to be taken:
1) It can not be too heavy, else it will damage the ceiling or worse, it fell & hit the patrons.
2) It should be visible to see from the ground & must be eye-catching.
3) The Sheeps must be cute enough to be eye-catching.
4) It has to be sturdy enough to withstand the wind & not fall.

Honestly, I have not done anything huge before so it took me 2 whole weeks, back & forth, researching & trying out all sorts of materials. Finally! After 2 weeks, I have come to a decision: 
Option 1: very expensive
I use styrofoam ball & white pom-poms
I experimented with 2 sizes, 10in & 12in. 
12in too heavy. So, I chose 10in.

Option 2: more reasonable (half the price of option 1)
I use plain coloured lantern & cotton balls
Again, i selected 2 sizes, 10in & 12in.
Still, 12in is heavier. 

I showed it to my client & we confirmed to make option 2 since it won't be able to recycle...the next Sheep year is in 12 years. By then, the whole thing would have fallen apart...LOL

Here's what I made...
Batch 1: 18 units of 12in Lantern Sheeps (couldn't get all same size)

Batch 2: 9 units of 10in Lantern Sheeps (I gave the sample together since I won't be needing it.)

Took me about 4 none sleep nights to complete it. I'd say it is pretty fast...LOL

I used Black Foam to cut the head & legs. Thanks to hubby that helped with the cutting. Mind you, it took me several trips to different shops to get all the quantities that I want...Then for the eyes, I used White Felt & Black Foam for the eye ball.

Lastly, I tied the lantern with ribbons.

It was a great experience as it is so different from my normal orders. I can consider this as bulk order, in a much bigger size than what I usually do...

Let's just hope it will look nice in the mall...:)

Oh yea, after I completed the sheeps, guess what my younger son wants? He wants 1 of those sheep in his favorite color! So, we will have an Orange Sheep in da house very soon! As soon as I get a can of Orange Spray Paint! LOL 

I shall post it on the blog once the Orange Sheep is done...hehehe