Showing posts with label Yarn. Show all posts

Tuesday, April 5, 2016

Crochet fun camp

2nd Crochet Fun Camp this round...

This is what we made:

Crochet with Rainbow Loom, we made 3D Rose


Small Flower Keychain

Bouncy Ball...

With yarn, we made 2 layer flower keychain

Signature flower hair clip...

3D Swiss Roll Cake Coaster...

3D Flower Coaster...

Poncho...

And on the last day, we made Frosty the Snowman!!!


So proud of my students! Sense of achievement is super high! 😜😜😜 

Rainbow Bear for Christopher

Few years back, I made my 1st batch of Teddy Bears for Constantine's year end party pack for all his friends & teachers in pre-school. 

I also made Christopher 1, with his favorite color yarn: Orange.

Then, in 2014, I created a series of Expression Bear using rainbow colors...

Christopher had been pestering me to make a new bear for him because his Orange Baby Bear (yes, he named his Orange Bear as Baby Bear) is breaking apart. Reason being he always plays with him...when I finished making Baby Bear, he always bring him out, putting him in his pocket...

So, Baby Bear is all worn out, after years of washing & playing.

Since I need to prepare some bears for an event this round, I've decided to make him a new bear. So we went & bought the yarn of his choice...

Then I made this...


This round, with improved skill, I manage to make the bear more solid compared to Baby Bear. But the problem is...it is too solid until can't be stuffed inside the pocket!!!😂😂😂

Christopher named him Baby Rainbow Bear...he plays with him everyday but he has been complaining that he is too big to fit into his pocket so he can't bring him everywhere he wants...😅😅😅


Thursday, July 2, 2015

21st Week of Craft Activity (28th June 2015)

This week, we make Pom-Pom Animals using yarns.

Apart from yarns, we also used felt & chenille stems for the accessories.


So, which one is your favourite?

Friday, March 13, 2015

3rd Week of Craft Activities (1st Feb 2015)

Here are the Craft Activities for 1st Feb 2015...this was very popular & i repeated the same craft for 3 weekends (on top of the other crafts of course!)! LOL

Age Group 3-5: Paper Plate Pom Pom Sheep

Materials needed:
White paper plate x 1
Black Colored paper x 1
Googly Eyes x 2
White Pom- Poms or Cotton Balls
Scissors
Glue

Instruction:
1) Cut the face of the sheep, plus the legs accordingly. I used free hand to cut, but you may opt to google the template.
2) Glue the legs to the paper plate. 
3) Apply glue throughout the paper plate & start putting the pom-poms/cotton balls on it. (Here's when the kids had fun, throwing the balls to the plate & it stuck there! The younger ones were amused...)
4) Glue the googly eyes onto the face of sheep.
5) Glue the face onto the top part of the plate. Remember to check the location of the legs before sticking the face on!

And, you are done!


Age Group 6-8: Fluffy Pom Pom Sheep

This is 1 craft that even the adults can't resist & paid to make it!

Materials Needed:
Pom-pom Maker - various sizes depending on the size of the desired sheep
White Acrylic Yarn x 1 ball
Black colored foam paper x 1 piece
Googly Eyes x 2
Black colored Pipe Cleaner x 1
Scissors
Glue

Instruction:
1) Thread the yarn over & thru the pom-pom maker until you are happy with the thickness. The thickness will determine how fluffy your sheep will be. So, thread on as much as possible (eventhough it is a very tiring process...lol)
2) Cut the Black Pipe Cleaner into half & place it into the center of the circle of the pom-pom maker. Bend it to secure the legs.
3) Cut the yarns & tie it tightly.
4) Glue the googly eyes onto the sheep face. You can try google for the template if you are nit comfortable to cut it free hand.
5) Glue the face onto the yarn. Remember to check where the legs are!
6) Bend all 4 legs to desired length so that it can stand. 
7) Optional: I glued the sheep onto a base plate so that it can stand nicely.

Cute huh?

Age Group 9-12: Mini 3D Origami Sheep

Materials Needed:
Red Origami pieces x 3
Beige Origami pieces x 16
White Origami pieces x 89
Black Origami pieces x 12
White colored paper for the ears
Googly Eyes x 2
Scissors
Glue
Flower or any other decorations (optional)

Note: in case you need to refer to the diagram on how to fold the origami pieces, please refer to my previous blog here...

Instruction:
1) Starting from the bottom up, you should have 12 of the origami piece on each row. 
2) 1st 2 rows will be all White pieces.
3) 3rd row you will start to put 1 Red piece in between 2 Beige pieces. Fill up the rest of the 9 pieces with White.
4) 4th row put 2 Red pieces in each of the pocket of the Rec piece from 3rd row, then put 1 Beige piece on each side. Fill up the rest of the 8 pieces with White.
5) 5th row you will have 5 pieces of the Beige on top of the Red & Beige peuces from 4th row. Fill up the rest of the 7 pieces with White.
6) 6th row will have 4 pieces of Beige & 8 pieces of White.
7) 7th row will have 3 pieces of Beige & 9 pieces of White.
8) Finish off the remaining 2 rows with White.
9) Attach 2 pieces of Black on all 4 corners, spread them evenly. Then add the remaining 1 piece to all 4 legs.
10) Glue the ears, eyes & decorate it as you like!


Happy Crafting!


Monday, December 29, 2014

Car themed Tissue Box Holders

Recently, i have an order for a Car Tissue Box Holder from a dear friend. She wanted it to give to someone as a Christmas Gift.

She showed me a photo of the sample & asked if I can make something similar. 

This is what I made...

And, to make it more personalised, I asked to add in the recipient's initial...:)

After I delivered it, she asked me to make another one in Red! So so happy that she loved it so much...

TQ for your orders, Elaine! :D

Tuesday, November 18, 2014

Garden Fairy?

Constantine's classmate is having a Pirate & Garden Fairies themed birthday party soon, so i have to think of something to make, that is so special that it can not be purchased anywhere else. Most importantly, it has to resemble the birthday girl!

So, i asked the mommy what dress the birthday girl is going to wear on that day...she sent me a photo...

Based on this dress theme color, i started to check on the fairy's design. I found this from www.flowerfairies.com...this is perfect!
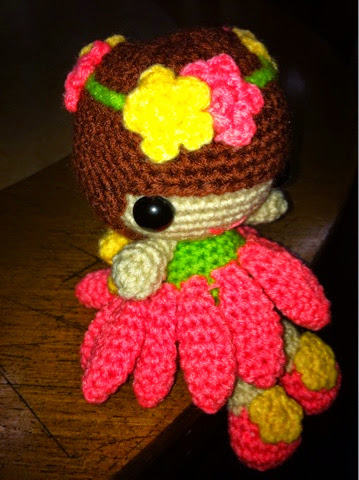
 I like the 'petal' dress...so I'm going to make one, using the same design as my sunflower petals...

Since the birthday girl's dress is Green & Peach, i made the top Green & petal dress Peach...

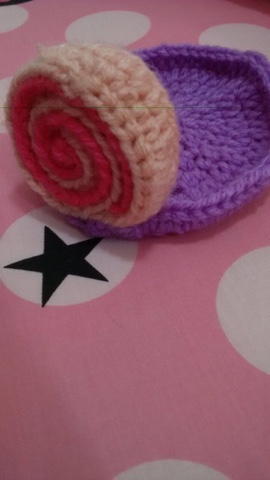
Then, i made the matching Peach ballerina flats with a Yellow flower on it. The flower has to be small or else it will cover the shoes...so, no fancy flowers...

Then, I started to think of the head of the fairy...Hm...how should I make it? Oh well, since I'm also into big head small body dolls (like my friendship Kokeshi Dolls collection, read here: http://designedwithpassion.blogspot.com/2014/07/presentingthe-friendship-kokeshi-dolls.html), I might as well make it the same!

I changed the hair color to Brown as I am using Beige color as the skin tone. (Black hair won't stand out). I love the outcome!

And since it is a garden fairy, no harm to wear a garland with flowers, right? :D

Oh, I also put a piece of pipe cleaner in each of the fairy's leg, so that the leg can be bended to sitting position...pretty cool! See how her legs bend at the edge of the table?

She can stand...well...not too stable...

She can sit...

Oh...I made a pair of Yellow wings too...how can I miss it...:) i wanted to make a large pair of wings but i'm afraid it will cover the dress, so I made a small 1 instead...

This fairy is too cute!

I hope Constantine's little friend will love it! :D

Material used: Acrylic Yarn, Polyester Fiber Fill, Safety Eyes, Pipe Cleaner
Duration of Completion: 5 man hours
Experience/Satisfaction level: 😍 hope to make more too!

Monday, September 15, 2014

Daniel & Kitty went for a Walk

Daniel wanted to go for a walk...he waited for Kitty to get ready.

And waiting...

Still waiting...

Finally! Kitty is all ready in her Red dress!

She looks all glamourous & stunning!


Both of them took a we-fie before the walk...since both are dressed up! See how they look into each other's eyes...so sweet & loving...


After the photos, Daniel suggested to go left but Kitty wanted to go right...

Not wanting to start a fight, Daniel is ready to go right, while Kitty is ready to go left, where Daniel wanted to go initially...

As they can't decide where they want to go, they started to argue...and both got angry...

Then, they decided to go where they wanted to go...Daniel to the left & Kitty to the right...

After they part ways, they walk & walk & walk...finally they reached to their destination...

To their surprise...they arrived at the same place!

They reached DWP shop, wanting to get each other a gift!

How sweet...