Showing posts with label class. Show all posts

Wednesday, March 11, 2015

1st Week of Craft Activities (18th Jan 2015)

So, following my previous blog on the extension of my love for craft, here are the 1st ever activity which we have conducted on 18th Jan 2015 at Malaysia's 1st Kids Enrichment Mall...:)

Here's the highlights:

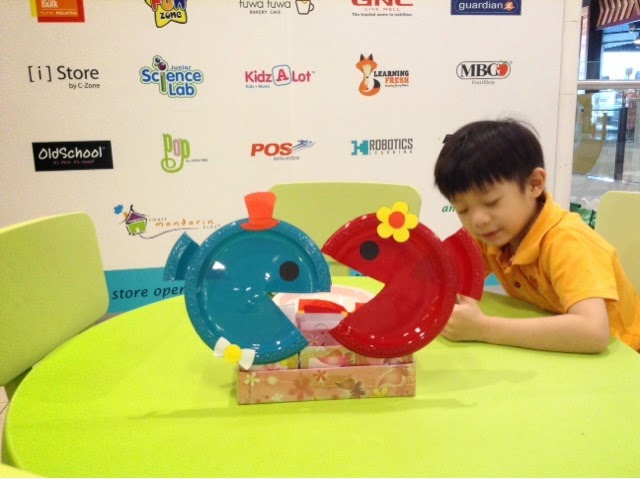
For Age Group 3 - 5, we made paper plate Fish. The kids will need to decorate the fish as well...

For this craft, you will need:
2 colored plates of your choice
A pair of scissors
Glue Stick and/or Tape
Decorative items of your choice - can be stickers or cut from colored paper (in our case, you cut the hat, bow tie & flower from colored paper
Black paper for the eyes

Instruction:
1) Cut the mouth according to you choice of size, in pie shape.
2) Stick the cut pie shape to the back of plate, in opposite direction. Pointy end facing inside. You may use glye or tape to stitck the piece. This will be the tail of the fish.
3) cut the eyes using Balck Paper. Size: approximately 4cm each. You will only need 1 on each plate. Stick the eye on top.
4) Decorate the fish as per your liking...:)
And, you are done!

For Age Group 6-8, we made Woven Paper Fish Hanging Mobile...

For this craft, you will need:
6 different colored papers, all cut, with 20cm length & 2.5cm width.
A pair of scissors
Glue stick
Thread to tie the fish
1 piece of pipe cleaner or Chenille stem
Hole Puncher
Googly eyes (optional)

Instruction:
1) With the cut colored paper, take 2 at a time (preferably constrasting colors), fold half & interlock them until you get the L shape.
2) Take the next Strip of paper by weaving it under the upped half of the folded strip & around the lower half of the folded strip. You should line the strip in the same color manner.
3) Take the 3rd strip & weave the same way as the 1st. By now, you should be able to see the beginning of a checkerboard pattern.
4) Next, take the other color & weave.
5) Weave the next strip as the 1st strip. 
6) Pull all strips tightly together. Since they are interlock, they should hold together tightly. Check both side to make sure you have a checkerboard pattern on both side.
7) With a glue stick, stick the remaining edges together.
8) Cut off the 2 middle strips flush to the edge of the checkboard.
9) Make diagonal cuts on all 4 remaining strips to make the fins & tail.
10) If you want, you can stick a pair of googly eyes on the fish.
11) With the hole puncher, punch a hole at the small square nearest to the top fin.
12) Tie the fish with thread.
13) Repeat step 1-12 to make another 2 fishes of different colors.
14) Hold 1 Pipe Cleaner/Chenille stem horizontally. Make a hook at each end using finger to make a small circle. Tie the other end of the thread thru the circle. Repeat with the other end of the pipe cleaner.
15) For the middle part, twist the pipe cleaner around your finger twice to make an 8 symbol (make sure the pipe cleaner is horizontal). Tie the remaining fish to the bottom circle. With another thread, tie the top circle. This is where you will hang the hanging mobile.

And, your woven paper fish hanging mobile is DONE!

And, for Age Group 9-12, we made 3D Origami Angel Fish...

For this craft, you will need:
2 contrasting colored papers of your choice. 1 main color & 1 secondary color
Red color paper for mouth
1 color for the base as a stand

If you need to cut the pieces from A4 paper, then the measurement is 3cm by 6cm. Or 2.5cm by 5cm. The bigger the pieces, the bigger your creation will be.

Here's what you need to fold:
Red color - 1 piece
Main color - 31 pieces
Secondary color - 14 pieces
Base color - 15 pieces

Here's a step-by-stepdiagram to show you how to fold the origami pieces. Photo source: origami.about.com

Once all e pieces is folded, we are ready to begin!

Start from the Red piece, add 1 main color piece to each of the pockets on each row like this:

As for the base, the diagram is like this:

Yea, I need to improve on my drawing...LOL

Happy Crafting!

Wednesday, January 28, 2015

New Year, New Me...

January is almost over & I realised that I have not written a single blog for the whole month! The last post was written on eve of new year & by the time I finished, it was new year...lol

Well, 2015 has been good so far...most of the efforts I put in last year has been moving according to the direction that I have planned out. At one point, it was so demotivating, but now it is like...I-can-see-some-light-at-the-end-of-the-tunnel kind of feeling...lol

Well, for sure, Designed With Passion is expanding. I setup the company in November 2014, wanted to use the name Designed With Passion, but was rejected...twice...told my company secretary that I insisted to use the name...after a few rounds of ding-dongs, & almost a week after, I was allowed to register the name, but with one condition...the name can not be just Designed With Passion alone...so, we finally settled with Designed With Passion Handicraft. At that point of time, I was a little disappointed as what I am doing is not exactly handicraft. I am very specific! I am only crocheting! LOL

It never cross my mind that all things happen for a reason, but now that I think of it, seriously, I was amazed how it has evolved.

In December, one of the reputable enrichment malls that I have been eyeing for, finally got in touch. I have been trying to get into that mall so that i can ask for a space to conduct crochet classes permanently, but to no avail. How I finally got in touch? A friend of a friend joined the marketing team of the mall & viola! Now we became friends...

Anyway, after a few rounds of discussion with the friend of my friend (lets call her E) & E's boss B, we finally got to go in, as a temporary service provider. What are we doing? Well, this is funny...we are providing handicraft activities to kids age 3 to 12 every Sunday! So, my company name fits in just right, right? So, conclusion is, we never know what arrangement the universe is prep-ing us...

So, to cut the story short, this few weeks have been extremely busy for me. Prep-ing the proposal for Q1, buying supplies, experimenting the activities to see how long it take, etc etc etc. wonderful but tiring. Not that I am complaining...it was fun, but at the same time nervous. I mean i love crafts, but to teach as a full time instructor...it is a new experience for me...now, my full time job is no longer Crochet, but as a Craft Instructor...cool huh?

It has been 2 Sundays since i started conducting the activities. This week will be my 3rd Sunday. Yesterday, we have just been confirmed as a permanent tenant & will be given a space in the enrichment mall..FINALLY! Plus, was told that we will be the anchor tenant for that particular program that they are promoting so we were invited to sit in to discuss on the fixture & all...i was like...WOW!

The space will be ready in March. Then, we will be able to conduct craft classes everyday at a fixed schedule. But, until then, we will be conducting craft activties every Sunday from 10am to 4pm.

What is next for me? Well, i need to think of a name for my craft space. Still can't decide what name to use as the logo. I have to admit I am not creative in terms of naming anything....that's why I am not able to get any Marketing jobs...lol then I need to come up with a tag line for the brand name. The tag line has to associate with my company name.

Next, i will need to re-visit my vision & mission of the company. 

Then, i need to source for more instructors & more craft activities (can't be doing everything on my own, right?)

So for now, this is what's happening...

Oh, I will also be posting the past activities in this blog so that you can have an idea what we do...:)
I have also registered a website: www.designedwithpassion.net
Sooner or later, I will be transferring everything to my own website, as soon as I figure out how! LOL
So, stay tuned!