Showing posts with label color. Show all posts

Tuesday, April 5, 2016

Flower arch

We have an order to make a Flower Arch for an event...

Knowing me...I usually want something unique & different...

It took me awhile to come up with the whole set...with some modifications...

The brief from the client was: 1 piece of 5ft & 2 pieces of 3ft on each side...

So, I made this...with different sizes of colored tissue papers...


Ok, now the most challenging part...how to transport it in 3 pieces!

So, I stick all the flowers into 3 parts using Felt. Part 1 is 5ft, part 2 & 3 is 3ft each...

Oh, I also changed some of the huge flowers to 2 tone ones...as requested by client...

After sticking all the flowers onto Felt, it made delivery easier & it doesn't really damage the flowers.

Putting up the final touch, after the setup...oh yea...the flagline also completed by us...

Full view of the completed arch...

Up-close view...

Lady boss modeling in front of the flower arch...


Mission accomplished! Another satisfied customer! πŸ‘πŸΌπŸ‘πŸΌπŸ‘πŸΌ

Rainbow Bear for Christopher

Few years back, I made my 1st batch of Teddy Bears for Constantine's year end party pack for all his friends & teachers in pre-school. 

I also made Christopher 1, with his favorite color yarn: Orange.

Then, in 2014, I created a series of Expression Bear using rainbow colors...

Christopher had been pestering me to make a new bear for him because his Orange Baby Bear (yes, he named his Orange Bear as Baby Bear) is breaking apart. Reason being he always plays with him...when I finished making Baby Bear, he always bring him out, putting him in his pocket...

So, Baby Bear is all worn out, after years of washing & playing.

Since I need to prepare some bears for an event this round, I've decided to make him a new bear. So we went & bought the yarn of his choice...

Then I made this...


This round, with improved skill, I manage to make the bear more solid compared to Baby Bear. But the problem is...it is too solid until can't be stuffed inside the pocket!!!πŸ˜‚πŸ˜‚πŸ˜‚

Christopher named him Baby Rainbow Bear...he plays with him everyday but he has been complaining that he is too big to fit into his pocket so he can't bring him everywhere he wants...πŸ˜…πŸ˜…πŸ˜…


Wednesday, March 11, 2015

1st Week of Craft Activities (18th Jan 2015)

So, following my previous blog on the extension of my love for craft, here are the 1st ever activity which we have conducted on 18th Jan 2015 at Malaysia's 1st Kids Enrichment Mall...:)

Here's the highlights:

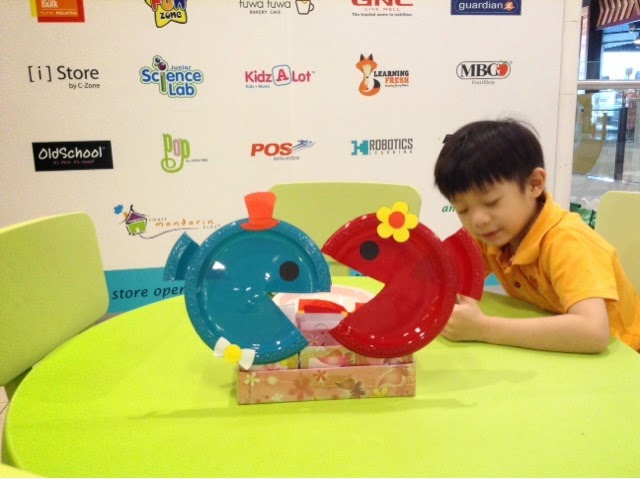
For Age Group 3 - 5, we made paper plate Fish. The kids will need to decorate the fish as well...

For this craft, you will need:
2 colored plates of your choice
A pair of scissors
Glue Stick and/or Tape
Decorative items of your choice - can be stickers or cut from colored paper (in our case, you cut the hat, bow tie & flower from colored paper
Black paper for the eyes

Instruction:
1) Cut the mouth according to you choice of size, in pie shape.
2) Stick the cut pie shape to the back of plate, in opposite direction. Pointy end facing inside. You may use glye or tape to stitck the piece. This will be the tail of the fish.
3) cut the eyes using Balck Paper. Size: approximately 4cm each. You will only need 1 on each plate. Stick the eye on top.
4) Decorate the fish as per your liking...:)
And, you are done!

For Age Group 6-8, we made Woven Paper Fish Hanging Mobile...

For this craft, you will need:
6 different colored papers, all cut, with 20cm length & 2.5cm width.
A pair of scissors
Glue stick
Thread to tie the fish
1 piece of pipe cleaner or Chenille stem
Hole Puncher
Googly eyes (optional)

Instruction:
1) With the cut colored paper, take 2 at a time (preferably constrasting colors), fold half & interlock them until you get the L shape.
2) Take the next Strip of paper by weaving it under the upped half of the folded strip & around the lower half of the folded strip. You should line the strip in the same color manner.
3) Take the 3rd strip & weave the same way as the 1st. By now, you should be able to see the beginning of a checkerboard pattern.
4) Next, take the other color & weave.
5) Weave the next strip as the 1st strip. 
6) Pull all strips tightly together. Since they are interlock, they should hold together tightly. Check both side to make sure you have a checkerboard pattern on both side.
7) With a glue stick, stick the remaining edges together.
8) Cut off the 2 middle strips flush to the edge of the checkboard.
9) Make diagonal cuts on all 4 remaining strips to make the fins & tail.
10) If you want, you can stick a pair of googly eyes on the fish.
11) With the hole puncher, punch a hole at the small square nearest to the top fin.
12) Tie the fish with thread.
13) Repeat step 1-12 to make another 2 fishes of different colors.
14) Hold 1 Pipe Cleaner/Chenille stem horizontally. Make a hook at each end using finger to make a small circle. Tie the other end of the thread thru the circle. Repeat with the other end of the pipe cleaner.
15) For the middle part, twist the pipe cleaner around your finger twice to make an 8 symbol (make sure the pipe cleaner is horizontal). Tie the remaining fish to the bottom circle. With another thread, tie the top circle. This is where you will hang the hanging mobile.

And, your woven paper fish hanging mobile is DONE!

And, for Age Group 9-12, we made 3D Origami Angel Fish...

For this craft, you will need:
2 contrasting colored papers of your choice. 1 main color & 1 secondary color
Red color paper for mouth
1 color for the base as a stand

If you need to cut the pieces from A4 paper, then the measurement is 3cm by 6cm. Or 2.5cm by 5cm. The bigger the pieces, the bigger your creation will be.

Here's what you need to fold:
Red color - 1 piece
Main color - 31 pieces
Secondary color - 14 pieces
Base color - 15 pieces

Here's a step-by-stepdiagram to show you how to fold the origami pieces. Photo source: origami.about.com

Once all e pieces is folded, we are ready to begin!

Start from the Red piece, add 1 main color piece to each of the pockets on each row like this:

As for the base, the diagram is like this:

Yea, I need to improve on my drawing...LOL

Happy Crafting!

Tuesday, December 2, 2014

Aeroplane Plush

Honestly, I have made a lot of Airplanes, but have not really write a blog about it. Reason being I couldn't find an airport mat to place the planes on...

Anyway, since I am preparing for boy's version of toys (plus, we dont know what gifts Constantine is going to give his male friend for the Xmas exchange party on Friday. (Please refer to my previous blog on the Cars to find out more)

I have some small airplanes, & some big ones...

These are the small ones...for the small ones, i actually made them into magnets & keychains as well...

These are the big ones...

For comparison of the big & small ones...

These photos are also taken by my boys...pretty good! :D

Note that these are not my original pattern. You may refer the original pattern here: http://www.innerchildcrochet.com/patterns/mini_stuffed_airplane.html

Monday, December 1, 2014

The wheels on the car goes round & round...

This blog has been my longest overdue blog of the year!

I have been wanting to do some boys version of Toys out of yarns but never been able to start until now.

Of course, it is with a little 'motivational' push from my eldest son...lol...He told me that they are going to have a gift exchange for Xmas in school next week...everyone will have to prepare a little present & give it to a 'secret' friend they got through ballot system. He got a male friend. So, we have to prepare a gift for a male friend. 

Not knowing what this friend likes, we better prepare some boys version of toys, just in case...

In case you are wondering why I make so many, this is because I also have a Christmas Bazaar coming up next week, so I'm preparing for it as well...:D I made 12 in total, all different colours!

This is not my own design, but I really love the shape of the car, so I've decided to make it regardless. You may refer here (http://www.redheart.com/free-patterns/happy-little-car-plane-truck)
for the original pattern. I have mine a little modified.

They are just lovely!

Oh, since I am busy preparing for other items for the bazaar, i asked my 2 boys to take photos for me.

I can see that they put in a lot of effort & the result turned out great! Especially the track...


Friday, August 22, 2014

The Expression Bears Bag Charms/Keychains

After the launch of the Expression Bears yesterday, I have made them to be Bag Charms/Keychains so that we can bring them along everywhere we go...

Here's the Bag Charms/Keychains:

1) Love, the Red Bear

Needless to say, based on her name, I definitely have to add a heart shaped charm on it...


2) Warmth, the Orange Bear

Isn't it a heart warming smiley emoticon...love the big grin...


3) Joy, the Yellow Bear

What would you do when you are happy? You dance to the music of course!


4) Balance, the Green Bear

The star has 5 points. It represents health, wealth, family, friends & self...if you have balance in all 5 areas, you are well balanced!


5) Peace, the Blue Bear

Dove is the universal symbol for peace. Hence I added a dove. Not sure if it looks like one...LOL...but it looks cute!


6) Faith, the Indigo Bear

Faith is when you believe, when you hope...I added a Four Leaf Clover to Faith, so that it brings you more luck & confident.


7) Passion, the Purple Bear

Passion is all about pursuing one's dream. The flower is my signature flower that I first made when I decided to pursue my dream, hence, I added it to Passion so that everyone has the courage to pursue what they dream of!


Do you like the Bag Charms/Keychains? Which one is your favourite?

These Bag charms/Keychains will be available for sales at my Etsy shop:
https://www.etsy.com/shop/joeychin28