Showing posts with label 3D. Show all posts

Tuesday, April 5, 2016

Crochet fun camp

2nd Crochet Fun Camp this round...

This is what we made:

Crochet with Rainbow Loom, we made 3D Rose


Small Flower Keychain

Bouncy Ball...

With yarn, we made 2 layer flower keychain

Signature flower hair clip...

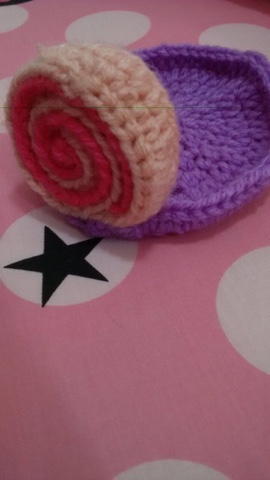
3D Swiss Roll Cake Coaster...

3D Flower Coaster...

Poncho...

And on the last day, we made Frosty the Snowman!!!


So proud of my students! Sense of achievement is super high! 😜😜😜 

Friday, June 5, 2015

New Craft Skill 2: The Journey Continues

Ok, after all the experiments, Im finally ready for the 3D version of the Perler Beads craft journey. For this, i referred to some YouTube videos to get some ideas on how to make it. This is the example that I followed exactly from the video:

The Piano...lovely, isn't it?


Then, I worked on these once I got the hang of it:

Rainbow Cake...a hit among the girls...

Hi-Tea anyone?

Tea Break for one...

Tractor...

Garden...

And my all time favourite...Horse Carousel at the Funfair!

This craft is so cool, I think I'm going to make more items soon!

Sunday, May 24, 2015

17th Week of Craft Activity (24th May 2015)

This week, we introduced creative 3D Quilling as part of our craft activity...we used corrugated cardboard to do the quilling.

In case you wonder what quilling is all about...

Quilling or paper filigree is an art form that involves the use of strips of paper that are rolled, shaped, and glued together to create decorative designs. This art have been around for hundreds of years in fact. We can actually use different kind of paper to make this.

This is very addictive too...lol


Let's hope the kids enjoy making these!

Friday, March 13, 2015

3rd Week of Craft Activities (1st Feb 2015)

Here are the Craft Activities for 1st Feb 2015...this was very popular & i repeated the same craft for 3 weekends (on top of the other crafts of course!)! LOL

Age Group 3-5: Paper Plate Pom Pom Sheep

Materials needed:
White paper plate x 1
Black Colored paper x 1
Googly Eyes x 2
White Pom- Poms or Cotton Balls
Scissors
Glue

Instruction:
1) Cut the face of the sheep, plus the legs accordingly. I used free hand to cut, but you may opt to google the template.
2) Glue the legs to the paper plate. 
3) Apply glue throughout the paper plate & start putting the pom-poms/cotton balls on it. (Here's when the kids had fun, throwing the balls to the plate & it stuck there! The younger ones were amused...)
4) Glue the googly eyes onto the face of sheep.
5) Glue the face onto the top part of the plate. Remember to check the location of the legs before sticking the face on!

And, you are done!


Age Group 6-8: Fluffy Pom Pom Sheep

This is 1 craft that even the adults can't resist & paid to make it!

Materials Needed:
Pom-pom Maker - various sizes depending on the size of the desired sheep
White Acrylic Yarn x 1 ball
Black colored foam paper x 1 piece
Googly Eyes x 2
Black colored Pipe Cleaner x 1
Scissors
Glue

Instruction:
1) Thread the yarn over & thru the pom-pom maker until you are happy with the thickness. The thickness will determine how fluffy your sheep will be. So, thread on as much as possible (eventhough it is a very tiring process...lol)
2) Cut the Black Pipe Cleaner into half & place it into the center of the circle of the pom-pom maker. Bend it to secure the legs.
3) Cut the yarns & tie it tightly.
4) Glue the googly eyes onto the sheep face. You can try google for the template if you are nit comfortable to cut it free hand.
5) Glue the face onto the yarn. Remember to check where the legs are!
6) Bend all 4 legs to desired length so that it can stand. 
7) Optional: I glued the sheep onto a base plate so that it can stand nicely.

Cute huh?

Age Group 9-12: Mini 3D Origami Sheep

Materials Needed:
Red Origami pieces x 3
Beige Origami pieces x 16
White Origami pieces x 89
Black Origami pieces x 12
White colored paper for the ears
Googly Eyes x 2
Scissors
Glue
Flower or any other decorations (optional)

Note: in case you need to refer to the diagram on how to fold the origami pieces, please refer to my previous blog here...

Instruction:
1) Starting from the bottom up, you should have 12 of the origami piece on each row. 
2) 1st 2 rows will be all White pieces.
3) 3rd row you will start to put 1 Red piece in between 2 Beige pieces. Fill up the rest of the 9 pieces with White.
4) 4th row put 2 Red pieces in each of the pocket of the Rec piece from 3rd row, then put 1 Beige piece on each side. Fill up the rest of the 8 pieces with White.
5) 5th row you will have 5 pieces of the Beige on top of the Red & Beige peuces from 4th row. Fill up the rest of the 7 pieces with White.
6) 6th row will have 4 pieces of Beige & 8 pieces of White.
7) 7th row will have 3 pieces of Beige & 9 pieces of White.
8) Finish off the remaining 2 rows with White.
9) Attach 2 pieces of Black on all 4 corners, spread them evenly. Then add the remaining 1 piece to all 4 legs.
10) Glue the ears, eyes & decorate it as you like!


Happy Crafting!


Wednesday, March 11, 2015

1st Week of Craft Activities (18th Jan 2015)

So, following my previous blog on the extension of my love for craft, here are the 1st ever activity which we have conducted on 18th Jan 2015 at Malaysia's 1st Kids Enrichment Mall...:)

Here's the highlights:

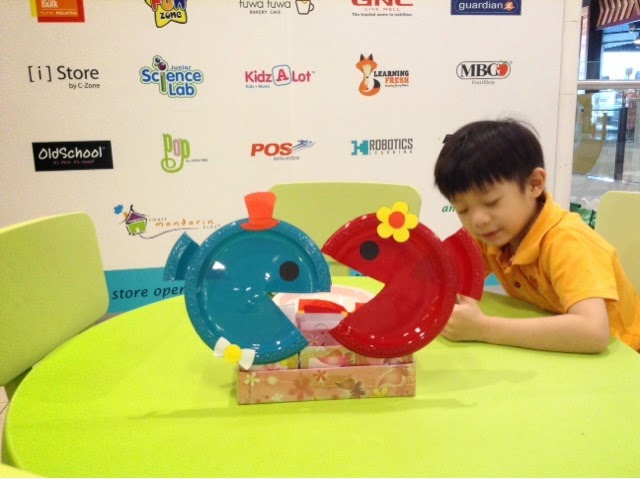
For Age Group 3 - 5, we made paper plate Fish. The kids will need to decorate the fish as well...

For this craft, you will need:
2 colored plates of your choice
A pair of scissors
Glue Stick and/or Tape
Decorative items of your choice - can be stickers or cut from colored paper (in our case, you cut the hat, bow tie & flower from colored paper
Black paper for the eyes

Instruction:
1) Cut the mouth according to you choice of size, in pie shape.
2) Stick the cut pie shape to the back of plate, in opposite direction. Pointy end facing inside. You may use glye or tape to stitck the piece. This will be the tail of the fish.
3) cut the eyes using Balck Paper. Size: approximately 4cm each. You will only need 1 on each plate. Stick the eye on top.
4) Decorate the fish as per your liking...:)
And, you are done!

For Age Group 6-8, we made Woven Paper Fish Hanging Mobile...

For this craft, you will need:
6 different colored papers, all cut, with 20cm length & 2.5cm width.
A pair of scissors
Glue stick
Thread to tie the fish
1 piece of pipe cleaner or Chenille stem
Hole Puncher
Googly eyes (optional)

Instruction:
1) With the cut colored paper, take 2 at a time (preferably constrasting colors), fold half & interlock them until you get the L shape.
2) Take the next Strip of paper by weaving it under the upped half of the folded strip & around the lower half of the folded strip. You should line the strip in the same color manner.
3) Take the 3rd strip & weave the same way as the 1st. By now, you should be able to see the beginning of a checkerboard pattern.
4) Next, take the other color & weave.
5) Weave the next strip as the 1st strip. 
6) Pull all strips tightly together. Since they are interlock, they should hold together tightly. Check both side to make sure you have a checkerboard pattern on both side.
7) With a glue stick, stick the remaining edges together.
8) Cut off the 2 middle strips flush to the edge of the checkboard.
9) Make diagonal cuts on all 4 remaining strips to make the fins & tail.
10) If you want, you can stick a pair of googly eyes on the fish.
11) With the hole puncher, punch a hole at the small square nearest to the top fin.
12) Tie the fish with thread.
13) Repeat step 1-12 to make another 2 fishes of different colors.
14) Hold 1 Pipe Cleaner/Chenille stem horizontally. Make a hook at each end using finger to make a small circle. Tie the other end of the thread thru the circle. Repeat with the other end of the pipe cleaner.
15) For the middle part, twist the pipe cleaner around your finger twice to make an 8 symbol (make sure the pipe cleaner is horizontal). Tie the remaining fish to the bottom circle. With another thread, tie the top circle. This is where you will hang the hanging mobile.

And, your woven paper fish hanging mobile is DONE!

And, for Age Group 9-12, we made 3D Origami Angel Fish...

For this craft, you will need:
2 contrasting colored papers of your choice. 1 main color & 1 secondary color
Red color paper for mouth
1 color for the base as a stand

If you need to cut the pieces from A4 paper, then the measurement is 3cm by 6cm. Or 2.5cm by 5cm. The bigger the pieces, the bigger your creation will be.

Here's what you need to fold:
Red color - 1 piece
Main color - 31 pieces
Secondary color - 14 pieces
Base color - 15 pieces

Here's a step-by-stepdiagram to show you how to fold the origami pieces. Photo source: origami.about.com

Once all e pieces is folded, we are ready to begin!

Start from the Red piece, add 1 main color piece to each of the pockets on each row like this:

As for the base, the diagram is like this:

Yea, I need to improve on my drawing...LOL

Happy Crafting!

Wednesday, June 25, 2014

Things we can make using flowers...


Yesterday my eldest son told me that this Thursday, his school is having Teacher's Day celebration. As usual, he wants to give his teachers something...so I thought ok, why not? So, I asked him how many teachers & he replied 12... I was like WHAT? 12 presents in 1 day time??? Best when he told me he is going to prepare cards for the teachers as well. He said proudly that he had finished 1 card...in 1.5hrs time...so, I asked him how long does he think he will need to prepare the rest of the cards? After some quick calculation, he got panicked as he knew he is not going to be able to finish all the cards in time. So, I suggested that he does it on the computer instead...luckily, he managed to finish all the cards today before bedtime...then it is my turn to help him decorate it & print it out.

Sometimes, I wonder whether my kids are testing my 'super power' or they really think I am a Magician...I'm a handy crafter...all my masterpieces are handmade & it needs time...guess they won't understand it...lol

Anyway, with the limited time frame, I have to come out with 12 presents...in 1 day time...after some thinking, I've decided to try something new, with my newly found 'toy'...I bought some magnets last weekend, not knowing why but I just bought it...maybe the universe knows I will be needing this...LOL...and thank god for it too...otherwise, I won't be able to prepare 12 presents in 1 night!

Ok, this is what we made...


Isn't my son sweet? He personalised all the messages to his teachers...


Alright, time to eat my dinner, or more like supper since it is almost 1am now...and then, I'll be off to bed...nighty night!