Friday, March 13, 2015

New Craft Skill 1: The Journey

Following my blog on me picking up a new skill (read here), I am proud to say that Picking up new skill is seriously not as difficult as I thought. All we need is a little determination & alot of experiementation & trial & error...

Here's what I've made so far, with a little 'motivational push' from my sons...

After Constantine presented the Party Packs & presents to his classmates (blog available here), one of his classmates asked him whether he knew how to make Starburst bracelet. The poor boy is so clueless, he came back to me with that challenge. So, I did some research & watched some YouTube video, & after a few rounds of trial & errors, I managed to make it. Not one, not 2, but 12! All for you know who...Constantine said he wanted to give it to his classmates as Chinese New Year gift...a little show off, don't u think so?

This is what I made...

Anyway, I told him that I would be best if he is the one making it...so, I bought him his own Rainbow Loom set with all the colours that he wanted. He has been doing it ever since then & so far is still making bracelets. 

Here's what he has made for himself so far...

This is what he made for me & Christopher...

Then, Christopher also wanted a set of his own, so I have to buy a set for him too, but his is pretty basic as he only wants his favourite coloured bands: Red, Yellow & Orange. Yea, his Loom Tool Box only has that few colors, both opaque & jelly ones...lol

As he is still very unsure how to make it (i think he is just not into Rainbow Loom...lol) he didn't really make alot of stuffs. He only completed 2 bracelets so far...1 for himself (i helped to loop the bands) & 1 for his daddy (at least he is putting efforts into completing it himself). The Red 1 is his & the golden 1 is daddy's...

Then, I also made a few bracelets for myself & the kids (more of an experiment)...

After that, all requests for their friends' presents suddenly become a 'must' to include Rainbow Loom...sigh...

So, here is what I've made so far...

Alphabet Loom Bag Tag for Christopher's classmate...can you see the alphabet 'Hanz'? :)

Loom Rabbit Charm/Keychain for Constantine's classmate...i made 1 similar 1 in Grey color for Christopher's classmate...

Loom Flower Bracelet for Constantine's classmate...

And also some bracelets for Christopher's classmates similar to what I've made for him but in different colours...

Well, I'm sure there will be more! :)

3rd Week of Craft Activities (1st Feb 2015)

Here are the Craft Activities for 1st Feb 2015...this was very popular & i repeated the same craft for 3 weekends (on top of the other crafts of course!)! LOL

Age Group 3-5: Paper Plate Pom Pom Sheep

Materials needed:
White paper plate x 1
Black Colored paper x 1
Googly Eyes x 2
White Pom- Poms or Cotton Balls
Scissors
Glue

Instruction:
1) Cut the face of the sheep, plus the legs accordingly. I used free hand to cut, but you may opt to google the template.
2) Glue the legs to the paper plate. 
3) Apply glue throughout the paper plate & start putting the pom-poms/cotton balls on it. (Here's when the kids had fun, throwing the balls to the plate & it stuck there! The younger ones were amused...)
4) Glue the googly eyes onto the face of sheep.
5) Glue the face onto the top part of the plate. Remember to check the location of the legs before sticking the face on!

And, you are done!


Age Group 6-8: Fluffy Pom Pom Sheep

This is 1 craft that even the adults can't resist & paid to make it!

Materials Needed:
Pom-pom Maker - various sizes depending on the size of the desired sheep
White Acrylic Yarn x 1 ball
Black colored foam paper x 1 piece
Googly Eyes x 2
Black colored Pipe Cleaner x 1
Scissors
Glue

Instruction:
1) Thread the yarn over & thru the pom-pom maker until you are happy with the thickness. The thickness will determine how fluffy your sheep will be. So, thread on as much as possible (eventhough it is a very tiring process...lol)
2) Cut the Black Pipe Cleaner into half & place it into the center of the circle of the pom-pom maker. Bend it to secure the legs.
3) Cut the yarns & tie it tightly.
4) Glue the googly eyes onto the sheep face. You can try google for the template if you are nit comfortable to cut it free hand.
5) Glue the face onto the yarn. Remember to check where the legs are!
6) Bend all 4 legs to desired length so that it can stand. 
7) Optional: I glued the sheep onto a base plate so that it can stand nicely.

Cute huh?

Age Group 9-12: Mini 3D Origami Sheep

Materials Needed:
Red Origami pieces x 3
Beige Origami pieces x 16
White Origami pieces x 89
Black Origami pieces x 12
White colored paper for the ears
Googly Eyes x 2
Scissors
Glue
Flower or any other decorations (optional)

Note: in case you need to refer to the diagram on how to fold the origami pieces, please refer to my previous blog here...

Instruction:
1) Starting from the bottom up, you should have 12 of the origami piece on each row. 
2) 1st 2 rows will be all White pieces.
3) 3rd row you will start to put 1 Red piece in between 2 Beige pieces. Fill up the rest of the 9 pieces with White.
4) 4th row put 2 Red pieces in each of the pocket of the Rec piece from 3rd row, then put 1 Beige piece on each side. Fill up the rest of the 8 pieces with White.
5) 5th row you will have 5 pieces of the Beige on top of the Red & Beige peuces from 4th row. Fill up the rest of the 7 pieces with White.
6) 6th row will have 4 pieces of Beige & 8 pieces of White.
7) 7th row will have 3 pieces of Beige & 9 pieces of White.
8) Finish off the remaining 2 rows with White.
9) Attach 2 pieces of Black on all 4 corners, spread them evenly. Then add the remaining 1 piece to all 4 legs.
10) Glue the ears, eyes & decorate it as you like!


Happy Crafting!


Thursday, March 12, 2015

2nd Week of Craft Activities (25th Jan 2015)

Here are the activities conducted on 25th Jan 2015...hope you like it!

Age Group 3-5: Cherry Blossom Tree (Paper Punching Art)

Materials:
Cherry Blossom Puncher x 1
White Paper Plate x 1
Brown Magic Pen x 1 (you can use brown oil paint as well)
Glue x 1
Pink colour Paper x 1

Instructions:
1) With the Brown Magic Pen, draw the tree trunk & branches onto the paper plate. 
2) With the Puncher, punch as many flowers as you want from the Pink coloured paper.
3) Glue the flowers onto the paper plate & decorate it the way you like it!

You can stick the plate onto your wall.


Age Group 6-8: Felt Cherry Blossom

Materials:
Light Pink Felt x 1
Bright Pink Felt x 1
Brown Pipe Cleaners 3mm
Brown Pipe Cleaners 6mm
Scissors x 1
Cherry Blossom flower Template
Plyer x 1

Instruction:
1) With the Template, draw as many Cherry Blossom as you desire with the Light & Bright Pink felts.
2) Cut the felt accordingly. 
3) Fold the flower in half & cut a small hole. This is to enable use to put the pipe cleaner through later.
4) With the Plyer, cut the 3mm Brown Pipe Cleaner into 4 pieces.
5) Roll the 3mm pipe cleaner from step 4 2 times to make it a small circles. Then, put the pipe cleaner thru the small hole on the felt. Repeat for all felts.
6) with 1 piece of the 6mm Brown Pipe Cleaner as the main stem, use another 6mm Brown Piepe Cleaner to wrap the main stem until end.
7) Repeat for all Cherry Blossoms.


Age Group 9-12: Crochet Cherry Blossom

Material:
Light Pink Acrylic Yarn x 1
Dark Pink Acrylic Yarn x 1
Brown Pipe Cleaner 6mm
Dark Pink Pipe Cleaner 6mm
Light Pink Pipe Cleaner 6mm
Crochet Hook 2.5mm x 1

Instruction:
1) To make the Cherry Blossom, work in circle, no sl st.
Magic Ring --> 5 SC --> [in each of the SC, make a sl st, HDC, 3DC, HDC, sl st.] in contrast color as the magic ring, as per the photo.
2) To assemble, 
Cut the light & dark pink pipe cleaners into 4 pieces. 
Fold half, then another half of the small piece.
Take 1 Brown Pipe cleaner as the main stem, & another Brown pipe cleaner to wrap the light/dark pink pipe cleaner that you folded earlier together with the main stem.
Continue to wrap the Cherry Blossoms until end of the main stem.

Repeat for as many stalks as you like.

Well, hope you enjoyed this week's craft! :)


Wednesday, March 11, 2015

1st Week of Craft Activities (18th Jan 2015)

So, following my previous blog on the extension of my love for craft, here are the 1st ever activity which we have conducted on 18th Jan 2015 at Malaysia's 1st Kids Enrichment Mall...:)

Here's the highlights:

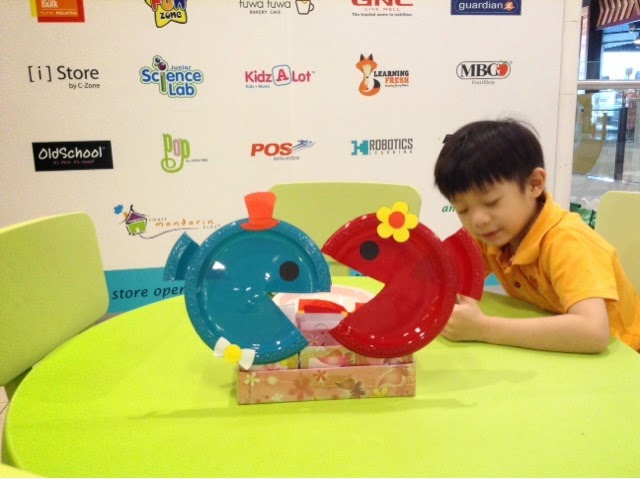
For Age Group 3 - 5, we made paper plate Fish. The kids will need to decorate the fish as well...

For this craft, you will need:
2 colored plates of your choice
A pair of scissors
Glue Stick and/or Tape
Decorative items of your choice - can be stickers or cut from colored paper (in our case, you cut the hat, bow tie & flower from colored paper
Black paper for the eyes

Instruction:
1) Cut the mouth according to you choice of size, in pie shape.
2) Stick the cut pie shape to the back of plate, in opposite direction. Pointy end facing inside. You may use glye or tape to stitck the piece. This will be the tail of the fish.
3) cut the eyes using Balck Paper. Size: approximately 4cm each. You will only need 1 on each plate. Stick the eye on top.
4) Decorate the fish as per your liking...:)
And, you are done!

For Age Group 6-8, we made Woven Paper Fish Hanging Mobile...

For this craft, you will need:
6 different colored papers, all cut, with 20cm length & 2.5cm width.
A pair of scissors
Glue stick
Thread to tie the fish
1 piece of pipe cleaner or Chenille stem
Hole Puncher
Googly eyes (optional)

Instruction:
1) With the cut colored paper, take 2 at a time (preferably constrasting colors), fold half & interlock them until you get the L shape.
2) Take the next Strip of paper by weaving it under the upped half of the folded strip & around the lower half of the folded strip. You should line the strip in the same color manner.
3) Take the 3rd strip & weave the same way as the 1st. By now, you should be able to see the beginning of a checkerboard pattern.
4) Next, take the other color & weave.
5) Weave the next strip as the 1st strip. 
6) Pull all strips tightly together. Since they are interlock, they should hold together tightly. Check both side to make sure you have a checkerboard pattern on both side.
7) With a glue stick, stick the remaining edges together.
8) Cut off the 2 middle strips flush to the edge of the checkboard.
9) Make diagonal cuts on all 4 remaining strips to make the fins & tail.
10) If you want, you can stick a pair of googly eyes on the fish.
11) With the hole puncher, punch a hole at the small square nearest to the top fin.
12) Tie the fish with thread.
13) Repeat step 1-12 to make another 2 fishes of different colors.
14) Hold 1 Pipe Cleaner/Chenille stem horizontally. Make a hook at each end using finger to make a small circle. Tie the other end of the thread thru the circle. Repeat with the other end of the pipe cleaner.
15) For the middle part, twist the pipe cleaner around your finger twice to make an 8 symbol (make sure the pipe cleaner is horizontal). Tie the remaining fish to the bottom circle. With another thread, tie the top circle. This is where you will hang the hanging mobile.

And, your woven paper fish hanging mobile is DONE!

And, for Age Group 9-12, we made 3D Origami Angel Fish...

For this craft, you will need:
2 contrasting colored papers of your choice. 1 main color & 1 secondary color
Red color paper for mouth
1 color for the base as a stand

If you need to cut the pieces from A4 paper, then the measurement is 3cm by 6cm. Or 2.5cm by 5cm. The bigger the pieces, the bigger your creation will be.

Here's what you need to fold:
Red color - 1 piece
Main color - 31 pieces
Secondary color - 14 pieces
Base color - 15 pieces

Here's a step-by-stepdiagram to show you how to fold the origami pieces. Photo source: origami.about.com

Once all e pieces is folded, we are ready to begin!

Start from the Red piece, add 1 main color piece to each of the pockets on each row like this:

As for the base, the diagram is like this:

Yea, I need to improve on my drawing...LOL

Happy Crafting!

Sunday, February 22, 2015

New Craft Skill 1 - the Beginning

Last Year, I made a resolution to pick up a new skill & master it every quarter.

Starting in January, I have started to pick up Rainbow Loom. I know, I know, you may say that the craze is over. I won't deny it. But what I am doing is not the bracelets, but other things.

I began the journey with Jelly Bands. Not my favorite type of bands though...the 1st item I made was this...it is done using the same method as crochet, only thing is we are using rubber bands instead of yarns...

1) 3D Star keychains...these are for my son's party pack for his classmates...

2) This is for one of his class mates that will be celebrating his birthday 2 days after my son...his name is Yuya, so I made an alphabet Y plus a star. I attached it to the crocheted car keychain to make it more personalized.

3) This is for his classmate that will be celebrating his birthday 3 days after his...he has Y & J in his name, hence the alphabets...& I attached it to the crochet car keychain as well.

Hm...not bad for a start...will be experimenting more items! Stay tuned!

Thursday, February 5, 2015

Hanging Sheep

Recently, I got an order to produce 26 units of Hanging Sheeps. It is to be hung on the ceiling of a mall in Klang Valley.

It took me almost 2 weeks to finally conclude what & how I want to make it. You see, since this is for hanging on the ceiling, certain important measures have to be taken:
1) It can not be too heavy, else it will damage the ceiling or worse, it fell & hit the patrons.
2) It should be visible to see from the ground & must be eye-catching.
3) The Sheeps must be cute enough to be eye-catching.
4) It has to be sturdy enough to withstand the wind & not fall.

Honestly, I have not done anything huge before so it took me 2 whole weeks, back & forth, researching & trying out all sorts of materials. Finally! After 2 weeks, I have come to a decision: 
Option 1: very expensive
I use styrofoam ball & white pom-poms
I experimented with 2 sizes, 10in & 12in. 
12in too heavy. So, I chose 10in.

Option 2: more reasonable (half the price of option 1)
I use plain coloured lantern & cotton balls
Again, i selected 2 sizes, 10in & 12in.
Still, 12in is heavier. 

I showed it to my client & we confirmed to make option 2 since it won't be able to recycle...the next Sheep year is in 12 years. By then, the whole thing would have fallen apart...LOL

Here's what I made...
Batch 1: 18 units of 12in Lantern Sheeps (couldn't get all same size)

Batch 2: 9 units of 10in Lantern Sheeps (I gave the sample together since I won't be needing it.)

Took me about 4 none sleep nights to complete it. I'd say it is pretty fast...LOL

I used Black Foam to cut the head & legs. Thanks to hubby that helped with the cutting. Mind you, it took me several trips to different shops to get all the quantities that I want...Then for the eyes, I used White Felt & Black Foam for the eye ball.

Lastly, I tied the lantern with ribbons.

It was a great experience as it is so different from my normal orders. I can consider this as bulk order, in a much bigger size than what I usually do...

Let's just hope it will look nice in the mall...:)

Oh yea, after I completed the sheeps, guess what my younger son wants? He wants 1 of those sheep in his favorite color! So, we will have an Orange Sheep in da house very soon! As soon as I get a can of Orange Spray Paint! LOL 

I shall post it on the blog once the Orange Sheep is done...hehehe