Tuesday, November 11, 2014

Looking for a unique Clutch? Make One!

Last Saturday, i had a wedding dinner to attend. I wore an Indigo long dress, with a pair of Light Grey heels. I planned to take a Light Grey dinner clutch, but it has to be able to fit my iPad Mini inside.

I bought many clutches before, but still most are not up to my expectation. So, i decided to STOP looking & make one myself.

1st, I need to look for the stitch design that I like. For bags, usually I use Star Stitch, as the stitches are unique & it makes the bag the 'thick' feeling...

Then, I make sure my iPad Mini can fit inside...

Next, I decided to add on the wristlet hook, so that I can put around my wrist.

Oh, I have also decided that the clutch can match other dresses as well, in case I want to use it for a different colour theme. Plus, the clutch must be able to be taken out to formal events or to simple outings.

ps: thinking about the design of the clutch makes everyone think that I'm a very demanding person...LOL...well...I AM! I expect nothing but perfection!

Here it is!

My very 1st clutch...it is simple enough to be just a pouch for my iPad Mini. 

I can put an iPad Mini, an iPhone, my mini purse, 1 lipstick & a compact powder! Small, but wonderful...

Best of all...i added this Flower brooch with a bling bling Rhinestone in the middle...:D The flower matches the colour of my dress...

I can bring this to any formal events...

Or, just as my iPad Mini Pouch...

And, if I want use it to match my other dress colour, I just change the brooch...:D

Just to let you have a visual how it matches my dress...

Super love this clutch! I will be making another clutch. This time it will be Peach color as I have an upcoming wedding dinner & my dress will be Peach in colour! Cant wait to start.

Material used: Acrylic Yarn
Duration to complete: 10 man hours
Experience/Satisfaction level: Priceless


Monday, November 10, 2014

Our Very 1st Crochet Fun Camp :D

Our fans have been very kind to us all this while. They have been providing feedback & suggestions in order for us to improve.

Many had requested for workshops, so, we have decided to make it happen this coming December! :D

We will be organizing our very 1st Crochet Fun Camp from the 15th - 19th December 2014 at KGNS, Kelana Jaya. We have 2 time slots: 9am - 12nn or 1.30pm - 4.30pm. For parents who require late pick up after the camp, we can accommodate as well, but please inform us upon sign up.

Throughout the 5 days fun camp, we will be creating at least 5 masterpieces. We are confident that everyone will have loads of fun doing it as well. Hint: some of the masterpieces will be Xmas presents for daddies & mommies! :P

We also encourage campers to come in pairs....what better way to enjoy something fun with someone you are close with, right? We will be giving a 10% discount for those who come in pairs or group. you can come with your parents, kids, siblings, relatives or friends. there is no restriction!

We only allocate 20 places for each session. This is to ensure quality interaction between the campers & instructor. No, you won't be watching the instruction from the YouTube! Yes, you will have to have face to face interaction throughout the camp! :D 

So, call us @ +6012 209 0906 to book your place NOW...
A little introduction of the instructor: Joey is a mother to 3 wonderful kids who designs, crafts & sells beautiful items out of yarns. Her dream is to re-introduce Crochet as a fun & yet relaxing activity to everyone who is interested. She was a business development professional, and now in the midst of pursuing her dream, one baby stitch at a time. She holds a Certificate of Good Conduct, issued by the MOFA Malaysia. Joey created the brand "Designed With Passion". As the name says it, this is where all items are carefully designed & hand-crafted with lots of patience, passion & love, for she believes everyone is special & deserve all the special attention!

Sunday, November 2, 2014

Congratulations to All Winners!

On Oct 1st, Crochet.Community hosted its Fall 2014 contest. This time round, the participants were required to create a scarf. The contest entry was closed on 24th Oct & then the foting started. All in all thry have received 25 entries. They just finished the voting process & winner was announced on the 1st Nov.

Here are the top 5 winners:
1st Prize: Broomstick Lace Scarf by Keri. She scored 41 points. Here's her masterpiece:

2nd Prize: Helen Cable Scarf by Allie. She scored 40 points. Here's her masterpiece:

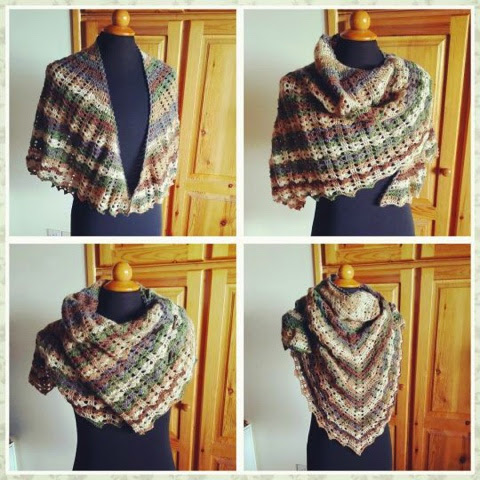
3rd Prize: Crochet Wedding Shawl by Etelina. She scored 32 points. Here's her masterpiece:

4th Prize: Rosemary Wrap by Farida Cahyaning Ati. She scored 26 points. Here's her masterpiece:

5th Prize: Forest Wings by Aureliaslittleroom. She scored 24 points. Here's her masterpiece:

For the rest of the entries, plesse go to crochet.community/awards/fall_2014/results

Frankly speaking, all the entries were fantastic. I'm sure the judges have had tough time deciding who is in top 5...:)

Monday, October 27, 2014

Hair Accessories for Girls - Part 1

My girl is growing up too fast! 

Now is the time to dress her up...:D

Here's what I've made for her so far..although her hair is not quite growing yet...lol

Rhinestone Mickey icon...my girl is so in love with Minnie Mouse recently. So this should do the trick...lol...I made 1 in Red & 1 in Maroon. Stick onto the hair clip using hot glue gun.

Ribbon Hair Clip. These are from Satin Ribbons. Made 1 in Purple, her favourite color & the other is Red.

Chiffon Ribbons Flower Hair Clips. I made 1 in Pink & 1 in Yellow. In the middle, there's a pearl bead.

This is my signature crocheted flower. So, I can't avoid doing it...:)

I made 3: Orange, Purple & Dark Pink

Since she is still small, I can't make too complicated hair clips...but I would, 1 day!

I'd have made more if there is no interruption...:P

So, stay tuned! I shall come up with Part 2 & more!

Sunday, October 26, 2014

My Girl's Crocheted Accessories

Girls being girls...we like to dress up...:)

Last Saturday, my girl & her 2 elder brothers had a photo shoot seesion with Kids-Tokei at Perdana Botanical Garden, KL. It was her 1st photo shoot session.

I prepared some accessories for the photo shoot, but at the very last minute as i was rushing for orders...

Here's the dress that i planned out for her...noticed the tiny little roses on the waistline?

Here's the back part of the dress...super love the giant bow! :)

And, here's the items that i made for her...

Red & White Baby Booties with Red & Pink Roses. This time, i added Red Ribbons to the booties & tie it around her ankle. It made her looked like a ballerina...lol

3-toned Roses Wristband. She was too fascinated to pull it out from her tiny hand...lol

3-toned Roses Hair Clip. This hair clip covers 1/3 of her head. Either she has a very small head or the hair clip is super large!

All in all, the photo shoot was a success. I can't wait to receive the photos! :D

Tuesday, October 21, 2014

Happy Birthday Elaine! Hope U like Your Sunflowers Bouquet!

Recently, I have an order from an ex-colleague. She wants to order a half dozen bouquet of sunflowers for her colleague cum best friend's birthday.

To be honest, I have always wanted to make sunflowers but never get a chance to make it as I don't know how it will turn out. I have no confidence to even try it last time!

So, when I receive an order, I told myself, somehow I need to overcome it. 

I begin with doing a lot of researches on sunflowers, the shape, the back of it, the colour, etc...thanks to the Internet, I managed to find what I am looking for!

This is one nice bouquet, photo downloaded from the Internet...

Of course, this is a huge bouquet, so, I need to reduce the number of sunflowers to only 6 stalks.

Then, I started to research on flowers that represent friendship, since this is a custom make bouquet with a personalised touch!

I found two flowers: 

This is White Hydrangea. It symbolises friendship & devotion. It represents understanding & it is seen as 1 of the purest ornamental flowers. Its magnificent bloom is a bouquet of dedication & it can be described as heavenly beautiful & charming. (Source: onlineflowerguide.com)

This is Yellow Acacia (photo source from Environmental World of Australia). The symbolic meaning of Acacia are friendship, secret love, beauty in retirement & chaste love. You can find a lot of this plant in Australia.

It took me about 3 hours to do all the researches & to find a sample that I like...then, it is back to my thinking zone.

According to my ex-colleague, she doesn't want the bouquet to be too huge or too heavy; & I have to include the White Hydrangea & Yellow Acacia into the bouquet...

So, this is what I made...

A bouquet of White Hydrangea, with some fern leaves...

Up-close pictures of it...

Then I made 3 stalks of Yellow Acacia. Each stalk contains 3 little yellow balls. Again, I added some fern leaves.

Up-close pictures...

After completed these 2, now the most 'fun' part...the SUNFLOWERS!

I started the experiment with the centre, then the petals...here's what I got...

This is a very large sunflower! Just so you know how huge this sunflower is, I made a comparison with my iPad mini...

I think I'm very satisfied with the outcome, so I continued with the other 5 stalks. I've decided to put 2 large stalks & 4 smaller ones.

Here's the small ones...

For comparison...the small flower is as big as my palm.

If I put both large & small together, you'll see a huge difference...

Now, I need to make the back part of the flowers...

Here's the picture I downloaded from the Internet...

Hm...very complicated back...so, this is what I made...

OK, all the flowers are ready, now the stems! I used lots of lots of wire stems for this bouquet as the flowers are rather heavy...I need a good support for it to stand up...oh, I also used balloon sticks for the very 1st time...loved it so much...I think I will continue to use it from now onwards. I then wrapped my stems with 8-ply green yarn. My 1st time too! If you know me, I always use ribbons to wrap my stem. I think the outcome is not bad huh...

These 2 are the large ones...

And, these are the small ones...

Ok...all done...except...where to put the name card? So, I made this, together with a clip beneath it...yes, it's a butterfly...:)

All done finally...now, this is a very challenging part for me as I am not very good with flower arrangements. But I think I passed...what do you think? :D

I asked a friend to hold the flowers so I can take the pictures...

The butterfly is so cute & prominent huh...

Final touch...the red ribbon to hold all together tightly...

And, it is ready to be delivered...

Oh, since I also know this colleague who is celebrating her birthday, & since she had requested a bunny rabbit as a present from me...here's what I made...I also bought her a cake...

On the way to meet her new owner...

This is a picture that my ex-colleague sent me when the bouquet & bunny rabbit is received....

All in all, my 1st bouquet of sunflower is a huge success! :D I might even consider making some for myself, when I have time...:P

Total duration took to make this bouquet: 48 man hours, not inclusive of research time. The experience: priceless! :D

Happy birthday to you, Elaine! May your year be blessed with more happiness & joy!